← Back to Aionik

Where we sit in the SLA 3D printing process SLA, stereolithography

Resin printing is not one operation. It is a print followed by a post process, and the two decide different things. The print decides the shape. The post process decides the surface, the optical clarity, and whether the part can be used in biology at all. We are the second step.

The workflow

Six steps, and we replace two of them

This is the standard route for a stereolithography or DLP part, from file to finished device. The two highlighted steps are the ones our process takes over.

01

Design and slice

The geometry is drawn and cut into layers. This is where a revision costs an afternoon rather than a new tool, and it is the whole reason printing is attractive for iteration.

02

Print

Light cures liquid resin layer by layer. The printer sets the feature resolution, and nothing downstream can recover detail the printer did not produce.

03

Drain and remove supports

The part comes off the plate wet, with liquid resin still on every surface and inside every channel.

04

Wash Ours

Conventionally an IPA bath to dissolve the uncured resin off the part. For a microfluidic chip this is the hard step, because the resin has to be cleared out of enclosed channels rather than wiped off a surface. Our process replaces this step entirely, with no solvent.

05

Post cure Ours

Conventionally UV and heat to finish polymerizing the part. This is where surface quality, optical clarity, and biocompatibility are won or lost, and it is the step we changed.

06

Finish and use Partly ours

Ports, tubing, and whatever the experiment needs. We produce our own threaded ports, so part of this step is ours too. With our process the part reaches it 1 to 3 minutes after the print rather than after a wash and a cure cycle.

Two of the six steps are ours outright and a third is partly ours. What happens inside those steps is the technology, and it is described on this page. How we intend to build a business around it is commercial strategy, and that is not public.

The two families

SLA and FDM are not the same tool

Consumer 3D printing is mostly FDM, which is why the phrase carries a reputation microfluidics cannot use. The distinction matters, because only one of the two families reaches these features at all.

01

FDM, fused deposition modeling

A heated nozzle lays down molten filament in beads, line by line. Resolution is set by the nozzle diameter and the layer height, and the finished part is a stack of fused strands.

02

SLA, stereolithography

Light cures liquid resin. Resolution is set by the optics rather than by a nozzle, which is what puts microfluidic features in reach, and the part comes out as one solid rather than as bonded strands.

03

Why FDM does not apply here

Bead geometry leaves seams between strands, so a channel wall is neither smooth nor reliably sealed, and the finish is opaque. For a device that has to hold fluid at micron scale and be looked through, that rules it out before cost or speed enter the argument.

The reason this work requires SLA is not preference. Curing liquid resin with light places a feature wherever the optics can focus, so precision is bounded by the light path rather than by the width of a bead or the size of a powder grain. That is what puts a smooth, sealed, optically clear channel at micron scale within reach. No deposition or powder based family can produce that geometry at all, which is why every other route is out before cost, speed, or materials are discussed.

Everything on this page is about SLA and the DLP variants alongside it. The full range of 3D printing methods, and where each one lands, is here →

The hard step

Why the wash is the problem in SLA (stereolithography) printed microfluidics

A printed part leaves the plate coated in liquid resin. On a solid object that is a surface problem and a solvent solves it. A microfluidic chip is not a solid object.

01

The resin is inside the part

Channels are enclosed, often tens of microns across. Getting uncured resin out of them is a different problem from washing a surface, and it gets harder as the channel gets smaller.

02

Geometry fights the solvent

The features that make a chip useful, narrow channels and enclosed volumes, are the same features that make a bath ineffective at reaching them.

03

What is left behind matters

Anything not cured and not removed stays in the device, which is why this step, rather than the resin alone, has kept printed parts out of a lot of biological work.

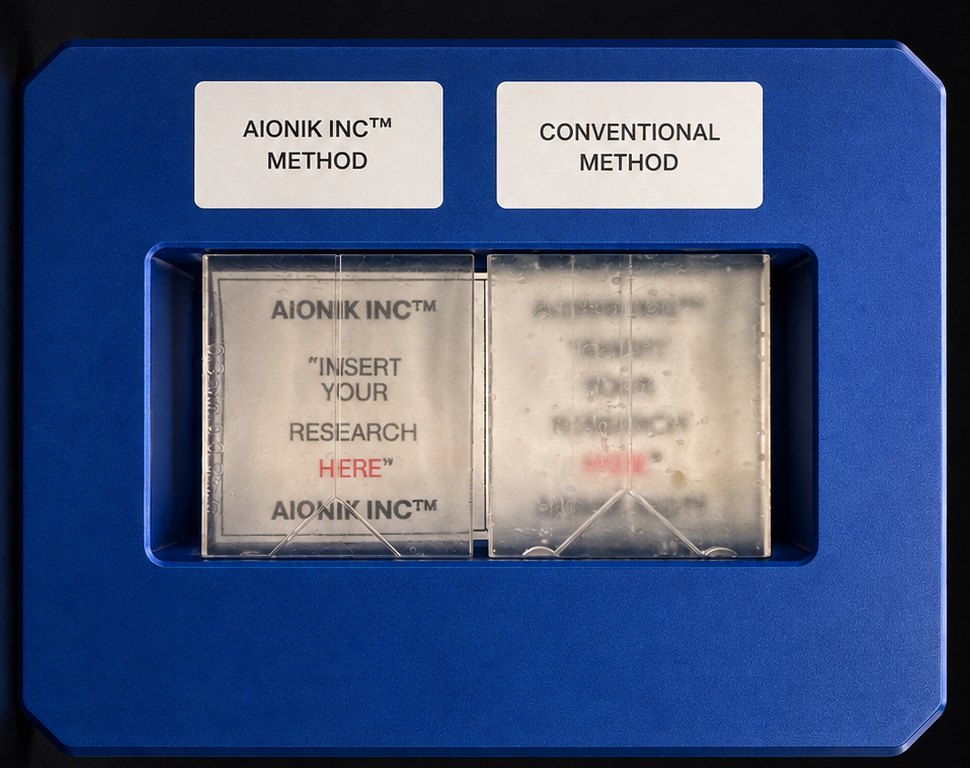
Two microfluidic chips side by side. The chip finished with the Aionik method is optically clear and the printed text beneath it is legible. The chip finished by the conventional method is hazy and the same text is distorted and unreadable.
The same part, two finishing routes. Both chips were printed from the same resin. The one finished with our process (left) is optically clear enough to read printed text through it. The one taken through the conventional route (right) is hazy and distorts the same text. This is the step being described above, photographed rather than argued.

Our process removes the solvent step rather than optimizing it, and combines the clearing and the cure into one operation of 1 to 3 minutes.

How far it reaches

Our step is separate from the printer's step

The printer’s step and ours do not overlap. That separation is what sets how far the process can reach.

01

The printer sets resolution

How fine a feature can be made is a property of the machine and the resin, decided at step 02 and fixed from then on.

02

We set what happens after

Clearing and curing happen at steps 04 and 05, downstream of geometry. Our process does not compete with the printer, it finishes what the printer made.

03

So the two should compose

A higher resolution printer should produce a finer part that our process finishes the same way, which would extend the reach of both without changing either.

04

Stated as a hypothesis

We have demonstrated the process on standard and specialized SLA hardware. We have not tested it against the highest resolution microfluidic printers, and we do not claim that result.

Resolution is bought with capital

Purpose built microfluidic resin printers reach finer geometry than the general purpose SLA hardware we have used. The CADworks3D ProFluidics 285D, for example, publishes a 28.5 µm pixel resolution with closed channels down to 80 µm. Machines in that class are sold on a quote basis rather than a list price, in the way production equipment usually is.

That floor is real, and for the designs that need it there is no substitute. It is also lower than a large share of microfluidic work actually requires: a great many devices run channels in the hundreds of microns, where general purpose SLA hardware costing a fraction as much already resolves the geometry. The cost of that capability scales far faster than the number of applications that need it.

Our position is not opposite theirs. Our step happens after the print whatever produced it, so finer hardware should widen what the process reaches rather than compete with it. We have not yet run our process on parts from a machine in that class, and getting that access is exactly what the hypothesis above needs to become a result.

If it holds, the ceiling on printed microfluidics stops being the cure and becomes the printer, which is a problem the printing industry is already working on and improving every year without us.

In short

Printing made the shape. We made it usable

The industry spent years improving resins and printers. The step between the print and the part was the one still holding microfluidics back, and that is the step we changed.

See what we built